
General notes: Give a read-through the instructions first--you may have questions that will be answered and you'll be familiar with the order of operations. I'm using a 3/8 inch seam allowance, but if your want to go 1/4 inch that'll work fine too--just be consistent. Backstitch at the beginning and end of every seam. If you're using directional fabrics pay attention to your layout. And finally--I don't use a zipper foot. You can if you like yours, but mine isn't speaking to me at the moment :) I use my regular foot and adjust my needle position, as you'll see further on.
I used two prints for my purse--I had a little more than a fat quarter of each and it worked out just right. You'll also need two zippers (I like longer zippers so mine were twelve inches each). I am using a 1/4 inch swivel hook to attach my strap, but that's optional if you can't get your mitts on one. You'll also need fusible interfacing and fusible fleece.
Cut out the following:
- From the lining, fusible fleece, and fusible interfacing: 2 pieces each that each measure 6 inches by 9 inches
- From the fabric you're using for your strap (it can match or contrast): one piece that is 1.5 inches by 14 inches, and one piece that is 1.5 inches by 2.5 inches (if you're not using a hook you can omit that last piece)
- From the exterior fabric: cut 2 pieces that each measure 6 inches by 9 inches; two pieces that each measure 3 inches by 9 inches; two pieces that each measure 5 inches by 9 inches. NOTE: one of each of those pieces will come together to be the lining of the outside pocket, so if you want to use your lining print or other fabrics for it go ahead.

So many bits for one wristlet, but it'll be quite simple once we get started.
First we're going to make up the panel that has the outside zipper going across it, starting with the top part. So take your 3 by 9 inch pieces. Make a sandwich like so: exterior fabric, right side up, zipper face down, lining right side down. Align everything across the top, and clip/pin in place.

Zipper sandwich. Yummyyyyyy.
Stitch across the top taking care not to catch the zipper teeth in your stitching. It should look like this when you're done:

Now you're going to repeat this with the 5 by 9 inch pieces on the other side of the zipper. Make the same sandwich: exterior fabric piece face up, zipper face down, lining face down. Align, clip, stitch. You should have this when you're done:

We'll take care of that zipper overhang later.
Carefully (so you don't melt the zipper) press those fabrics away from the zipper. Then do a line of top-stitching. This will keep the fabric from getting stuck in the zipper.

You should now have this (you can barely see my top-stitching but it's there):

As everyone stitches their zippers a little differently, I made these pieces a little larger than necessary to accommodate that--now we trim so that this whole piece measures six inches high. I lined up my ruler (see below) and trimmed so there was two inches from the top edge of the zipper to the edge of the fabric. Trim the bottom however much you need to. Don't take anything off the sides.

Now we make the little tab for the hook to snap into. If you're skipping the hook take your skinny strip of fabric and follow the same steps--your piece will just be longer. Press your strip in half longways. Then unfold, and press each raw edge in towards that center fold. Then fold it in half again and press.


Top-stitch this piece on both edges (unless you hate symmetry and then just do it on the one edge to close it up :) Fold it in half and place it like so:

It's 5/8 inch down from the top edge with a little bit of overhang to make sure it's caught in the seam.
Stitch that in place.

I go over it a few times as straps and things like this tend to be stress points. If you skipped the hook you'll have a strap instead of a tab.
Now we assemble this as though it were a basic zipper pouch. We're going to treat one of the exterior fabric pieces and that zipper piece we made as one layer (essentially the pocket and its lining), so just read along carefully and you'll be fine.
Take an exterior fabric panel and lay it right side up. Take the zipper panel you just made and put that on top of it, also right side up (make sure the narrower piece is at the top).

Treat these two pieces as one layer.
Lay your zipper face down (make sure the side where the pull will be matches up with where the pull is on the other zipper). Then take a lining piece and put that face down. Line up the top edges nice and neat. Pin/clip in place.

It's a bit layer-tastic on this side but it's not too bad.

See how my foot is lined up at the edge of the zipper teeth, and how my needle is moved over?My zipper foot doesn't seem to work for me so I don't use it for bags--this method works fine for me. I take my time and feel for the raised edge of the teeth under the fleece to keep things lined up.
Now you've got this:

Now do the same thing to the other side. You'll have something that looks like this if you hold it from the top with the front facing you:

As we did before, press the seams flat up near the zipper. Then topstitch.
Unzip both zippers about halfway (one so we can turn the bag later, and the other to get it out of the way of the presser foot). Now take the exterior pieces and arrange them so the right sides are facing each other. Remember that you'll have three layers here, but two of them are being treated as one (see next photo). Take the lining and arrange the same way.

Pin/clip in place.

When you get to the zipper that cuts across the front leave that flat. The zipper at the top needs to be pinned so that the teeth are heading towards the lining:

Leaving about a five inch gap in the center of the bottom of the lining, stitch alllllll the way around. I like to go over the zipper area a few times for strength. Then clip your corners to get rid of some bulk--don't cut your stitching.

The zipper running across the top is going to be quite bulky in the corners unless we trim that too. Carefully cut away some of that bulk.

Reach through the gap you left in the lining (this is why we unzipped the top zipper) and pull everything through, right side out. Poke out your corners with a knitting needle or a chopstick or another pokey device (careful you don't bust your stitching!). Use your fingers to poke out the top corners where the zippers are. Then tuck the raw edges into the gap you left in the lining, pin, and stitch shut either by machine or by hand.

Tuck the lining down inside and press. You may need to work the side and bottom seams to flatten them a bit as they're a little bulky. If you're not using the swivel hook you're all done. If you are, you've got a few more steps.
Take your one remaining piece (that fourteen inch strip) and fold and press as we did above for the tab.

Slide your hook onto this (it might be a little tight as we haven't sewn it yet, but it'll work. Make sure it's not twisted, and pin the short edges, right sides together. Sew, and then press that seam open. You may need to repress the folds you made before, but you want this part to be neat so do it if you need to.

Now you have a long messy loop with a hook on it. Let's tidy that up. Pin along the open edges so you have a neater looking loop.

Topstitch along the edges, sliding the hook out of the way as you near it. When finished, position the hook so that it's near the seam. Sew the layers together--this keeps the hook snug in it's own tiny loop, and leaves the rest of the loop to slip around your wrist.

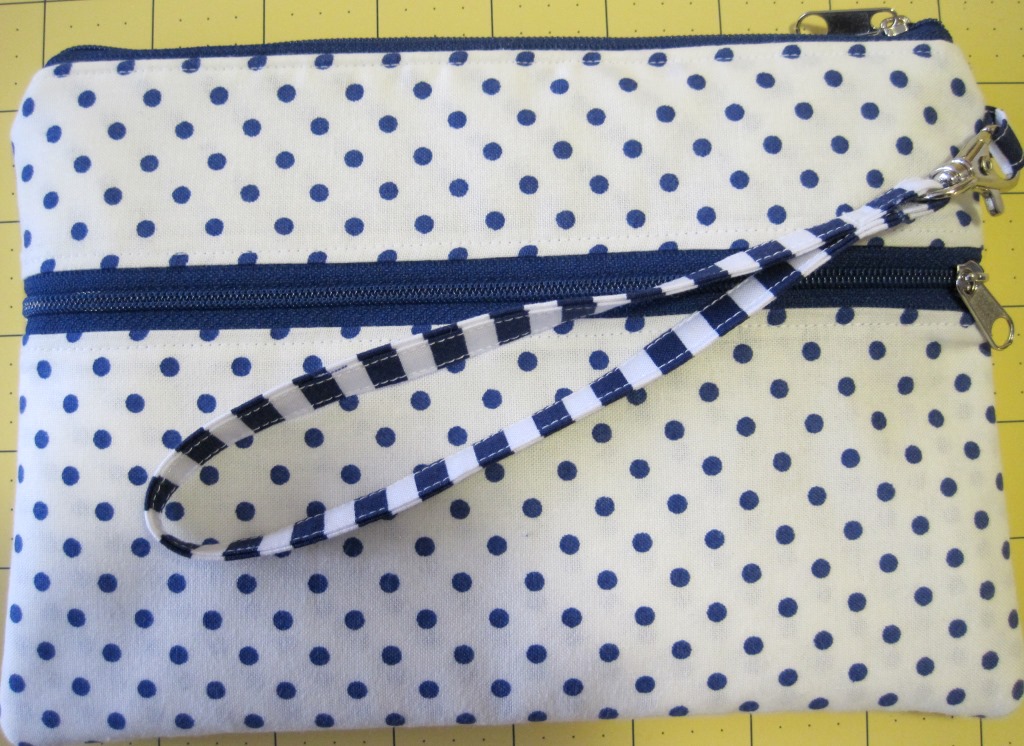
Clip it to your tab and that's it! A cute little double zip wristlet--plenty of room for everything you need without lugging your heavy handbag everywhere (because sometimes that's just tiring :)

Now that wasn't too bad, was it? You could have a lot of fun with fabrics for this one--patchwork, mix and match, some clever fussy cutting, or even make it in corduroy for cooler weather. And if you used just the right fabric I bet you could make a nifty evening bag. That's why bags are such fun--endless possibilities!
I gave this one to my mom and she filled it right away. While this looks like it might be large, it actually comes out to be quite a nice size. I'd love it if you added your creations to the Flickr group!
As ever, let me know if you have any questions. Happy sewing!

Wow - I'm exhausted! What a fantastic tutorial - it makes me want to rush to my fabric stash immediately and give it a go. Thank you x Jane
ReplyDeleteOne can never have too many pouches :oD
ReplyDeleteGreat Tute!!!!
ReplyDeletexo Kris
This is just what I was looking for. I perfect pouch to hold my phone, library card and a bit of cash, when I do my errands on foot! I must get right on this.
ReplyDeleteFirst, I need to find a swivel hook.
Oh I do want to try this, so much ... reading the instructions gave me a headache but I think a Tylenol might help with that ;) I might really try it, Sweet Bee, even with the zippers, it looks similar to just putting a zipper in a skirt or whatever, which I've done about a bazillion times. I'm reading through your blog slower and slower and slower, about one post a day, because I'm at 4/14/10 and that's getting near the end, which you know I do not want to happen! Thanks for sharing this great tutorial!!! Mary
ReplyDeleteVery nice work! Thanks for the tutorial!
ReplyDeleteHave a nice week!
Hugs from Bulgaria!!!
http://scentofstyl.blogspot.gr/
This is a fantastic tutorial, Bethany! Very well photographed and written. I really do need to make one of these. Hopefully my zipper foot will be on speaking terms with me, but now I know you can make it happen without one!
ReplyDeleteJulie @ The Crafty Quilter
Great job!Good tutorial!
ReplyDeletehttp://freestilcreatingbyvilly.blogspot.gr/
Really cute wristlet! Thank you for the tutorial, I am pinning this. It would be perfect to throw MY things in there and keep in the KIDS diaper bag. They have a way of taking over my things... :)
ReplyDeleteHeidi @ handmadefrenzy.blogspot.com
Great tutorial and cute fabric choice. Come link up to centerpiece Wednesday linky party on my blog and share this post with us. http://thestylesisters.blogspot.com/2013/06/dr-suess-party-and-centerpiece-wednesday.html
ReplyDeleteAwesome! I love the two zippers...makes it way better than just a simple zipper pouch. Thanks for sharing your tutorial!
ReplyDeleteVery cute, love the patterns together! We would love it if you would link up at our linky party:
ReplyDeleteTwo Girls and a Party
Live every Wednesday to Sunday. Hosted by:
Dana @ This Silly Girl's Life
Parrish @ Life with the Crust Cut Off
We hope to see you there!
super cute! you make it look so easy! :)
ReplyDeleteVery detailed tutorial.
ReplyDeleteThank you and thank you! Wonderful tutorial!
ReplyDeleteGreat tutorial - I made my first one today and it worked out perfectly - that doesn't always happen for me when I try new things, lol. Will be making more of these - I think they'll make great gifts!
ReplyDeleteJust the tutorial I was looking for and so clearly described. Thank you for being so helpful. Yay!! Can't wait to try it.
ReplyDeleteThank you for this tutorial! I've made myself several wristlets and now friends and family are begging for some. I love it!
ReplyDeleteI love this! Just what I was looking for! Thanks for much for the tutorial! Adorable. :) Happy sewing!!!!
ReplyDeleteExceptional sewing tutorial. Kudos!
ReplyDeleteAt the end, I have five layers of fabric. Your tutorial states to place the two exterior fabrics RS together, and two lining fabrics RS together... I understand that part of bag construction. This doesn't specify the piece in between them, so I'm assuming then that the extra backing/pocket lining (which is really an interior piece, not an exterior piece) whereas you indicate should be treated as one piece, this should be pinned to the exterior fabrics at the end before turning the bag?
ReplyDeleteThis was confusing trying to decipher the exterior vs. interior fabrics, because there are only two exterior fabrics after all is said and done.
Perhaps it would be less confusing if you were to name these interior smaller pocket front/back and interior larger pocket front/back pieces.
Cute bag.
We are treating those two layers as one here so I mention it as one, but I can see how it might be confusing. I've tried to add a little bit more text to clarify, and to remind folks of what to do with that "extra" layer when it comes to the final stages of assembling the bag.
DeleteThanks Bethany! Overall my bag turned out well, mine was more challenging since I had some directional fabrics going on with all the layers but I'm happy with the end result.
ReplyDeleteI love your strap tutorial, and I love that you specify which way the zipper teeth should face as not all tutorials do that. For the longest time I couldn't figure out why some zippers looked great and others were just plain wonky, now I realize why.
Thank you for sharing this tutorial with us.
Thank you so much for this tutorial! I've used it twice now and it's *very* useful for helping me sort out how the heck to manage all the layers! <3
ReplyDeletethanks for the tutorial! Just one quick question what is the dimension of the final pouch.
ReplyDeleteAbout 5 1/2 by 8 1/2. You can, of course, make this any size you'd like by adjusting your measurements and zipper length--the assembly process would still be the same.
DeleteHmm third time lucky maybe.my comment is not getting published because of my network problems. I loved the way the pouches turned out and am making couple more. Can't find yr Flickr to share pics.
ReplyDeleteCame across this tutorial the other day and decided to modify it to have two mitten clips across the top to attach to yoga pants when you have no pockets. So I'm using a lining fabric and an accent fabric on the bottom half of the front pocket. That being the case, does the fleece/interfacing go on one 6x9 lining and one exterior piece? Do the fleece pieces end up on the back side of the pouch?
ReplyDeleteAlso is there no interfacing/fleece on the front pocket pieces?
DeleteHi Stacy--there is no interfacing on the front pocket pieces (though you can absolutely add it if you want to--I just didn't).
DeleteRegarding the fleece--you have two 6x9 exterior fabric pieces. The fleece gets fused (or stitched, if you're using sew-in) to those pieces.
I really wanted to make this for a sewing swap but after several try’s and rip outs I gave up. I found it very confusing. 1 because your exterior fabric picture and lining are same fabric. 2 because exterior fabric could be exterior fabric with or without fleece, I never knew to which you were referring.
ReplyDelete